How to Write Junit Test Cases in Java Simple Example
- Details
- Written by
- Last Updated on 05 August 2019 | Print Email
In JUnit, a test suite allows programmers to combine and run multiple test cases as a single unit. It would be helpful if you separate your unit tests into different test cases and then you want to execute some test cases altogether at once. In this JUnit tutorial, you will learn:
- How to create JUnit Test Suite Class
- How to run JUnit Test Suite in Command Line
- How to create and run JUnit Test Suite in Eclipse
1. How to create JUnit Test Suite Class
To create a test suite, you have to create Java class that annotated with @RunWith and @SuiteClasses annotations. For example, the following code is of a test suite class:
import org.junit.runner.RunWith; import org.junit.runners.Suite; import org.junit.runners.Suite.SuiteClasses; @RunWith(Suite.class) @SuiteClasses({UserDAOTest.class, ProductDAOTest.class}) public class ProjectTestSuite { // code relevant to test suite goes here } The @RunWith annotation specifies the class that runs the tests instead of the default test runner in JUnit. For test suite, that class is Suite.class.
The @SuiteClasses specifies a list of test cases (test classes) to be included in the suite. In the example above, the two test classes are UserDAOTest and ProductDAOTest. Suppose the UserDAOTest has the following code:
import org.junit.Test; import static org.junit.Assert.fail; import static org.junit.Assert.assertNotNull; public class UserDAOTest { @Test public void testSaveUser() { UserDAO dao = new UserDAO(); User user = new User(); user = dao.save(user); assertNotNull(user); } @Test public void testDeleteUser() { fail("Not yet implemented"); } } The class under test is UserDAO:
public class UserDAO { public User save(User user) { // code to persist the User object return user; } public void delete(User user) { // code to remove the User object } } The second test class is ProductDAOTest with the following code:
import org.junit.Test; import static org.junit.Assert.fail; import static org.junit.Assert.assertNotNull; public class ProductDAOTest { @Test public void testSaveProduct() { ProductDAO dao = new ProductDAO(); Product product = new Product(); product = dao.save(product); assertNotNull(product); } @Test public void testUpdateProduct() { fail("Not yet implemented"); } } And the class under test is ProductDao:
public class ProductDAO { public Product save(Product product) { // code to persist the Product object return product; } public void delete(Product product) { // code to remove the Product object } } The two domain model classes are User and Product.
Again, the code of the test suite class looks like this:
@RunWith(Suite.class) @SuiteClasses({UserDAOTest.class, ProductDAOTest.class}) public class ProjectTestSuite { // code relevant to test suite goes here } Remember you have to use the two annotations @RunWith and @SuiteClasses .
2. How to run JUnit Test Suite in Command Line
To run the test suite class in command line, you need to create a test runner class that looks like this:
import org.junit.runner.JUnitCore; import org.junit.runner.Result; import org.junit.runner.notification.Failure; public class TestSuiteRunner { public static void main(String[] args) { Result result = JUnitCore.runClasses(ProjectTestSuite.class); for (Failure failure : result.getFailures()) { System.out.println(failure.toString()); failure.getException().printStackTrace(); } System.out.println("Test successful? " + result.wasSuccessful()); } } This Java console program runs the ProjectTestSuite class, retrieves the test result and prints the failures if any. And finally it prints the test status: successful or not.
To compile the test classes, test suite and test runner you must specify the JUnit JAR file in the classpath. For example, the following commands compile the above test classes with JUnit 4.12:
javac -cp junit-4.12.jar;. UserDAOTest.java javac -cp junit-4.12.jar;. ProductDAOTest.java javac -cp junit-4.12.jar;. ProjectTestSuite.java javac -cp junit-4.12.jar;. TestSuiteRunner.java
And to run the test runner you have to specify both JUnit and Hamcrest JAR files, for example:
java -cp junit-4.12.jar;hamcrest-core-1.3.jar;. TestSuiteRunner
And the output of the program would be like this:
testDeleteUser(UserDAOTest): Not yet implemented java.lang.AssertionError: Not yet implemented at org.junit.Assert.fail(Assert.java:88) at UserDAOTest.testDeleteUser(UserDAOTest.java:18) ... at TestSuiteRunner.main(TestSuiteRunner.java:8) testUpdateProduct(ProductDAOTest): Not yet implemented java.lang.AssertionError: Not yet implemented at org.junit.Assert.fail(Assert.java:88) at ProductDAOTest.testUpdateProduct(ProductDAOTest.java:18) ... at TestSuiteRunner.main(TestSuiteRunner.java:8) Test successful? false
Note that the full exception stack trace is shortened for brevity.
3. How to create and run JUnit Test Suite in Eclipse
Eclipse makes it very simple to create and run a JUnit test suite. The latest version of Eclipse (Oxygen) supports creating JUnit 4 test suite only.
To create a test suite class, click menu File > New > Other… > Java > JUnit > JUnit Test Suite.
The New JUnit Test Suite dialog appears:
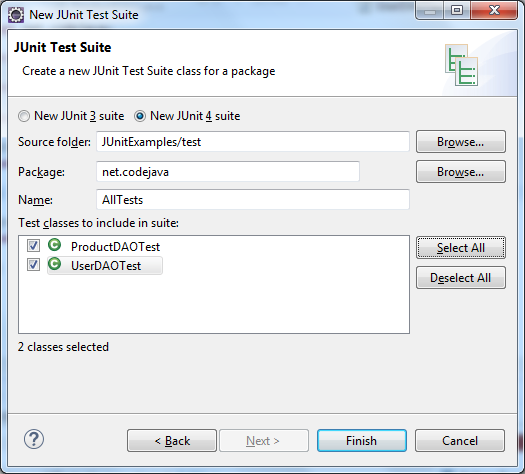
In this dialog, choose the source folder and the package that contains the test classes, then Eclipse lists the test classes to include in suite. Also specify the name of the test suite class. Then click Finish. Eclipse generates code for the test suite class follows:
package net.codejava; import org.junit.runner.RunWith; import org.junit.runners.Suite; import org.junit.runners.Suite.SuiteClasses; @RunWith(Suite.class) @SuiteClasses({ ProductDAOTest.class, UserDAOTest.class }) public class AllTests { } Now to run this test suite, just click Run > Run As > JUnit Test. Eclipse shows the JUnit view that looks like this:
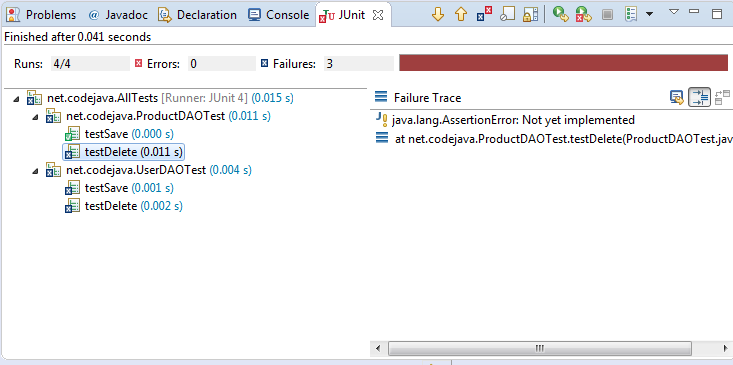
You see, this view allows you to easily review the test results: tests succeeded, tests failed and the failure trace.
Video:
Other JUnit Tutorials:
- JUnit Tutorial for beginner with Eclipse
- How to compile and run JUnit tests in command line
- JUnit Test Exception Examples - How to assert an exception is thrown
About the Author:
 Nam Ha Minh is certified Java programmer (SCJP and SCWCD). He started programming with Java in the time of Java 1.4 and has been falling in love with Java since then. Make friend with him on Facebook and watch his Java videos you YouTube.
Add comment
Source: https://www.codejava.net/testing/junit-test-suite-example-how-to-create-and-run-test-suite-in-command-line-and-eclipse
0 Response to "How to Write Junit Test Cases in Java Simple Example"
Post a Comment